Enabling Cody on Sourcegraph Enterprise
Learn how to use Cody and its features with Sourcegraph enterpise.
Cody enhances your coding experience by providing intelligent code suggestions, context-aware completions, and advanced code analysis. This guide will walk you through the steps to install and set up Cody with your Sourcegraph enterprise instance via:
 Cody Enterprise
Cody on self-hosted Sourcegraph enterprise
Prerequisites
- You have Sourcegraph version 5.1.0 or above
- A Sourcegraph enterprise subscription with Cody Gateway access or an account with a third-party LLM provider
Enable Cody on your Sourcegraph instance
Cody uses one or more third-party LLM (Large Language Model) providers. Make sure you review Cody's usage and privacy notice. Code snippets are sent to a third-party language model provider when you use the Cody extension or enable embeddings.
This requires site-admin privileges. To do so,
-
First, configure your desired LLM provider either by Using Sourcegraph Cody Gateway (recommended) or Using a third-party LLM provider directly
-
Next, go to Site admin > Site configuration (
/site-admin/configuration) on your instance and set:
    {
      // [...]
      "cody.enabled": true
    }
- Finally, set up a policy to automatically create and configure embeddings for your repositories.
Cody is now fully enabled on your self-hosted Sourcegraph enterprise instance!
Configure the VS Code extension
With Cody enabled on your Sourcegraph instance, any user can configure and use the Cody VS Code extension. This does not require admin privilege. However,
-
If you currently installed a previous version of Cody, uninstall it and reload VS Code before proceeding to the next steps
-
Search for "Cody AI” in your VS Code extension marketplace, and install it again
-
Reload VS Code, and open the Cody extension
-
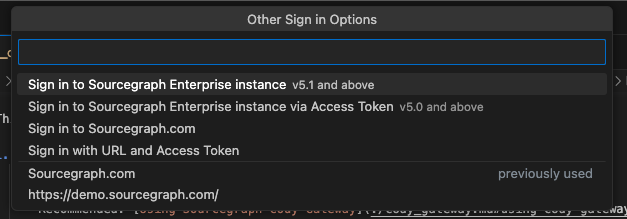
Next, to connect the Cody extension with your Sourcegraph instance, click the "Other Sign In Options..." and select your enterprise option depending on your Sourcegraph version (go to Sourcegraph > Settings, and the version will be in the bottom left)
-
If you are on version 5.1 and above, you will need to follow an authorization flow to give Cody access to your enterprise instance
- For Sourcegraph 5.0 and above, you'll need to generate an access token. From your Sourcegraph account, go to Settings > Access tokens (
https://<your-instance>.sourcegraph.com/users/<your-username>/settings/tokens)

- Create and copy your access token and return to VS code. Once again, click on the "Other Sign In Options..." and select "Sign in to Sourcegraph Enterprise instance via Access Token"
- Enter the URL for your sourcegraph instance and then paste in your access token
- For Sourcegraph 5.0 and above, you'll need to generate an access token. From your Sourcegraph account, go to Settings > Access tokens (
You're all set to use Cody on your self-hosted Sourcegraph instance. You can learn more about the Cody use cases here.
Cody on Sourcegraph Cloud
- With Sourcegraph Cloud, you get Cody as a managed service, and you do not need to enable Cody as is required for self-hosted setup
- However, by contacting your account manager, Cody can still be enabled on-demand on your Sourcegraph instance. The Sourcegraph team will refer to the handbook
- Next, you can configure the VS Code extension by following the same steps as mentioned for the self-hosted environment
- After which, you are all set to use Cody with Sourcegraph Cloud
Learn more about running Cody on Sourcegraph Cloud.
Enabling codebase-aware answers
The Cody: Codebase setting in VS Code enables codebase-aware answers for the Cody extension.
- Open your VS Code workspace settings via Cmd/Ctrl+,, (or File > Preferences (Settings) on Windows & Linux)
- Search for the
Cody: Codebasesetting - Enter the repository name as listed in your Sourcegraph instance, for example,
github.com/sourcegraph/sourcegraphwithout thehttpsprotocol
By setting this configuration to the repository name, Cody can provide more accurate and relevant answers to your coding questions based on the context of your current codebase.
Disable Cody
To turn Cody off:
- Go to Site admin > Site configuration (
/site-admin/configuration) on your instance and set:
    {
      // [...]
      "cody.enabled": false
    }
- Next, remove
completionsandembeddingsconfiguration if they exist
Enable Cody only for some users
To enable Cody only for some users, for example, when rolling out a Cody POC, follow all the steps mentioned in Enabling Cody on your Sourcegraph instance. Then, use the feature flag cody to turn Cody on selectively for some users. To do so:
- Go to Site admin > Site configuration (
/site-admin/configuration) on your instance and set:
    {
      // [...]
      "cody.enabled": true,
      "cody.restrictUsersFeatureFlag": true
    }
- Next, go to Site admin > Feature flags (
/site-admin/feature-flags) - Add a feature flag called
cody - Select the
booleantype and set it tofalse - Once added, click on the feature flag and use add overrides to pick users that will have access to Cody

Using a third-party LLM provider
Instead of Sourcegraph Cody Gateway, you can also configure Sourcegraph to use a third-party provider directly, like:
- Anthropic
- OpenAI
- Azure OpenAI (Experimental)
- AWS Bedrock (Experimental)
Anthropic
Create your own key with Anthropic here. Once you have the key, go to Site admin > Site configuration (/site-admin/configuration) on your instance and set:
{
  // [...]
  "cody.enabled": true,
  "completions": {
    "provider": "anthropic",
    "chatModel": "claude-2", // Or any other model you would like to use
    "fastChatModel": "claude-instant-1", // Or any other model you would like to use
    "completionModel": "claude-instant-1", // Or any other model you would like to use
    "accessToken": "<key>"
  }
}
OpenAI
Create your own key with OpenAI here. Once you have the key, go to Site admin > Site configuration (/site-admin/configuration) on your instance and set:
{
  // [...]
  "cody.enabled": true,
  "completions": {
    "provider": "openai",
    "chatModel": "gpt-4", // Or any other model you would like to use
    "fastChatModel": "gpt-35-turbo", // Or any other model you would like to use
    "completionModel": "gpt-35-turbo", // Or any other model you would like to use
    "accessToken": "<key>"
  }
}
Read and learn more about the supported OpenAI models here →
Azure OpenAI
Create a project in the Azure OpenAI portal. Go to Keys and Endpoint from the project overview and get one of the keys on that page and the endpoint.
Next, under Model deployments, click "manage deployments" and ensure you deploy the models you want, for example, gpt-35-turbo. Take note of the deployment name.
Once done, go to Site admin > Site configuration (/site-admin/configuration) on your instance and set:
{
  // [...]
  "cody.enabled": true,
  "completions": {
    "provider": "azure-openai",
    "chatModel": "<deployment name of the model>",
    "fastChatModel": "<deployment name of the model>",
    "completionModel": "<deployment name of the model>",
    "endpoint": "<endpoint>",
    "accessToken": "<See below>"
  }
}
For the access token, you can either:
- As of 5.2.4 the access token can be left empty and it will rely on Environmental, Workload Identity or Managed Identity credentials configured for the
frontendandworkerservices - Set it to
<API_KEY>if directly configuring the credentials using the API key specified in the Azure portal - If Azure Authentication requests require a proxy the environment variable
CODY_AZURE_OPENAI_IDENTITY_HTTP_PROXYcan be specified to a proxy URL
Anthropic Claude through AWS Bedrock
First, make sure you can access AWS Bedrock. Then, request access to the Anthropic Claude models in Bedrock. This may take some time to provision.
Next, create an IAM user with programmatic access in your AWS account. Depending on your AWS setup, different ways may be required to provide access. All completion requests are made from the frontend service, so this service needs to be able to access AWS. You can use instance role bindings or directly configure the IAM user credentials in the configuration.
Once ready, go to Site admin > Site configuration (/site-admin/configuration) on your instance and set:
{
  // [...]
  "cody.enabled": true,
  "completions": {
    "provider": "aws-bedrock",
    "chatModel": "anthropic.claude-v2",
    "fastChatModel": "anthropic.claude-instant-v1",
    "endpoint": "<AWS-Region>", // For example: us-west-2.
    "accessToken": "<See below>"
  }
}
For the access token, you can either:
- Leave it empty and rely on instance role bindings or other AWS configurations in the
frontendservice - Set it to
<ACCESS_KEY_ID>:<SECRET_ACCESS_KEY>if directly configuring the credentials - Set it to
<ACCESS_KEY_ID>:<SECRET_ACCESS_KEY>:<SESSION_TOKEN>if a session token is also required
Similarly, you can also use a third-party LLM provider directly for embeddings.